
By Dr David Smith
My father and my grandfather on my mother’s side were both mechanically minded and both subscribed to the philosophy of repairing things rather than throwing them out and buying new ones.
Dad had been a searchlight operator and truck driver in Australia’s far north during the second world war. Pop, my grandfather, repaired engines for the parks and gardens in Melbourne. When I brought home my first car, an Austin A30, Dad’s instruction to me was to set up a block and tackle and remove and dismantle the engine, then put it all back together. “It’s the best way to learn,” he said, and he was right.
Once I took the same car to Pop, telling him that the garage bloke said the carburettor couldn’t be fixed and I’d have to save up for a new one. Pop checked under the bonnet, then looked me in the eye and said, “Leave it with me and I’ll show you how I fixed it.” And fix it he did.
Given that background it’s obvious where I get my reputation as a Mr Fixit. This is the story of how I scored a genuine bargain of a ten-year-old cine camera and how I set about bringing it up to date.
The camera is a first series URSA Mini 4K EF from Blackmagic Design. I picked it up on Facebook Marketplace, along with four reasonable Canon lenses, a ZOOM SGH-6 digital recorder and shotgun microphone, four V-lock batteries and a 4-battery IDX charger, all for just $1,300. The charger and batteries alone retail for around $2,500, so it was a genuine no-brainer.
The URSA Mini 4K features a superb Super 35 sensor. This captures stunning detail and also makes it simple to achieve very shallow depth of field which is just about impossible in cameras with smaller sensors.
Unlike later models in the series, the 4K has a global shutter, rather than a rolling shutter found in many other high-end cine cameras. A global shutter captures information from the whole area of the sensor instantaneously. Rolling shutters, which scan across the sensor, are plagued with a distortion known as the ‘jello effect’. When panning, especially in fast pans, vertical objects such as doors or buildings appear to be tipped over at an angle. It’s an awful artifact to encounter, and it’s completely avoided in the Mini 4K. So that’s a big plus. Great images, shallow depth of field and no rolling shutter artefacts.
Optics
As I explored the features of my bargain camera, I learned I’d have to get to grips with some very basic issues. The 4K has no Neutral Density (ND) filters built in. All the video cameras I’ve used over decades have a switch or dial that lets you choose one of a series of ND filters as required. They have many uses, one of which is allow you reduce bright sunlight so the lens can be set at its optimal aperture of around f8. You can also use an ND to have the aperture wide open at say f1.4 which will minimize depth of field.
So how do I adjust brightness without inbuilt NDs? Very simply, actually. Exactly the same way you do it in a film camera, by screwing an ND filter onto the front of the lens. I sold all of the cheap kit lenses that came with the camera and replaced them with much better versions which, by careful searching were available at surprisingly reasonable prices. I bought variable ND and Circular Polarising filters in the appropriate sizes and solved the problem. OK, it takes a moment to adjust the variable ND filter, but that how it always was on a film camera so it’s not really any hassle at all.
 The Ursa Mini 4K has limited ISO settings, namely 200, 400 and 800. Of these, the 400 setting works best, with noise becoming an issue if you use the 800 setting. That’s a limitation, but it’s a cine camera so you just do what you would have done with a film camera and use proper lighting. Issue solved.
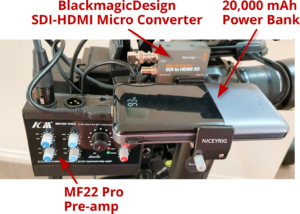
So far then, I had acquired a great set of lenses and filters, and solved the ND and ISO issues fairly easily. The next challenge was that the only video output was SDI. I needed to be able to have a monitor available but there was no HDMI or USB-C output. The simple solution was to purchase an SDI to HDMI Micro Converter box from Blackmagic Design for $125.
I looked at a variety of BMD monitoring solutions but they were beyond my budget at this stage. Instead I opted for a Viltrox DC-550 monitor. This little gem was available for a little over $200. It is extremely bright, has a pop-up sunshade and features numerous viewing options including Zebras and Peaking – which are also available in the URSA LCD and Electronic Viewfinder (EVF). It can be powered by USB, 12Volts or from a SONY NP-F970, of which I have a number left over from my Sony Z-1 HDV camera. See – it pays to keep these treasures!
The most crucial add-on, however, was a Blackmagic electronic viewfinder. Retailing for around $2,500, this was also out of my price range, but I spotted one in Facebook Marketplace for $850. It was in mint condition and made critical focussing and many other adjustments incredibly simple even in bright sunlight. This EVF features a 1920 x 1080 colour OLED screen and includes a host of button-selectable options, glass optics and an incredibly crisp display. It even features a high definition focus chart so you can adjust the dioptre easily and accurately.
OK, my optics are sorted, what else needs to be addressed?
Data storage
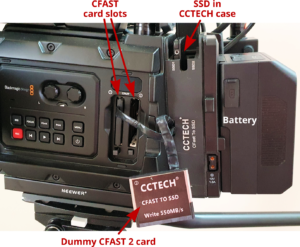 The URSA Mini 4K comes with just two CFAST 2.0 memory card slots. That’s fine except for the ridiculous cost of high performance CFAST cards, although after searching around I found a PixelFlash 3700X 512GB Hypercore card for about $400. Recommended top-spec 1TB CAST cards retail for from $1,500 to $2,500 each which was not a sensible option for me.
Later model URSA Minis have two additional SD card slots as well the option of recording from a USB-C or HDMI stream. That’s great but my camera doesn’t have those features.
I discovered various cheaper options, including a Zitay CFAST adapter system which uses a dummy CFAST card to send data to an external SSD board. This system works well for me, but I then explored a better option, produced by CCTECH. This black box attaches permanently to the back of the camera and has a pair of slots for 2.5” SSD cards, with a little lid to protect them. The battery V-lock plate and battery are bolted to the CCTECH box.
You simply drop an approved SSD card into one of the slots, then plug the appropriate dummy card into the slot in the URSA. There’s a flat cable connecting each dummy card to the box, which means you mustn’t try to shut the LCD screen door on the camera. Apart from that it’s an excellent solution. I bought one of the recommended SSD cards, a Samsung 870 EVO 1TB for $290, and it works flawlessly. The second-hand CCTECH box cost me $100.
Dialling up the most intense data flow, with 4096 x 2160 uncompressed lossless RAW video, will quickly show if an SSD can’t hack the pace. The red RECORD light in the viewfinder will show a white exclamation mark, indicating dropped frames. Solution? Buy a better SSD.
To capture the data to your computer, you simply remove the SSD from the CCTECH box and plug it into a suitable reader which will set you back about $25. I typically get read speeds of around 400-500MB/sec which is very important because with a camera like this you can rapidly acquire truly vast amounts of data.
Audio
 This issue came as a bit of a surprise. The camera has twin XLR audio inputs, level meters available in both the LCD screen and the EVF, and twin volume knobs to adjust the levels. Most adjustments are made in the Audio tab of the menu system. The options are clear and all the needed options – such as 48V phantom power, track selection and so on – are available and switchable. With one exception: the audio pre-amps are not powerful enough. A quick trawl through the forums made this quite clear. The URSA 4K pre-amps are not strong enough. So when I plugged in one of my excellent SONY shotgun mics, an ECM-672, there was barely any level at all. This was something I really hadn’t expected. What to do? Well, at least I knew why the second hand kit I bought included the ZOOM shotgun mic recorder! But surely there would be a more elegant way to get audio right into the camera itself.
I experimented with various external pre-amps but the ones I had available were quite large and not really suitable – but they worked! I did some searching and came up with an excellent ICM MF22 Pro pre-amp which was quite small, had excellent Class A pre-amps and worked a treat with both my SONY radio mics and shotguns. Nothing like seeing green VU meters moving up towards the yellow at -12dB! I picked this unit up from Swamp Industries for $129.
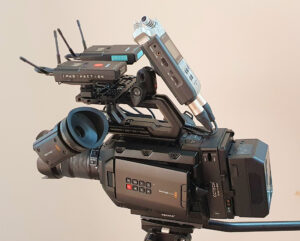
All I needed to do was put it all together. I fitted a SmallRig cheeseplate to the right hand side of the URSA. This shifted the handgrip forwards a little, and provided a separate rosette for attachment.
I bolted a small bar with a cold shoe plate to the top of the cheeseplate and then fitted a NICEYRIG power bank holder and the Blackmagic SDI-HDMI adapter box.
I made a small right angle adapter plate to which I bolted the MF22 pre-amp box. This unit was then bolted the back edge of the cheeseplate.
The end result was neat and tidy, all the cabling was straightforward and the camera now had all the key features I needed to film in a variety of real situations. The only real price to be paid was the weight gain. The whole shebang now weighs in at around 7kg. It’s possible to hand hold it or shoulder mount it but it is heavy. On a tripod? No dramas, just beautiful pictures and great audio.
Summary
I confess that it took me some time to get to grips with these various issues but after a few false starts and quite a bit of messing around I am very satisfied with the results I’ve achieved. The best add-on I purchased was the electronic viewfinder. The URSA’s large LCD screen is really good but in bright sunlight the EVF makes exposure and focussing so much simpler and more precise.
In effect I have set up a fully functioning digital cine-camera featuring a superb Super 35 sensor with a global shutter and the ability to record up to lossless RAW video. Massive data recording is handled by the external SSD, or by an internal CFAST card and the results are really stunning. Of course there are great advantages in working with the later model URSA Minis, not least of which are the physical controls available on those cameras,
The essential expenditure was $1,300 for the camera body, $140 for the audio pre-amp, $120 for the SDI-HDMI Micro Converter, about $200 for variable ND filters, $100 for the CCTECH black box and $290 for the Samsung 1TB SSD drive. That’s $850 to get the monitoring, data storage and audio systems up to speed. And that’s all you really need. Certainly the superb Blackmagic viewfinder is highly desirable and, of course, you’ll need to choose good quality lenses to suit your needs.
In order to offset this expenditure, I sold a variety of pieces of equipment on either eBay or Facebook Marketplace. These included a Nikon Coolscan 5000ED, my original Mavic Pro drone kit, the four lenses that came with the URSA, and even a flying model Lancaster bomber. In a nutshell, I broke even and have a beautiful video system that has the potential to earn money on subsequent projects, and which will be quite saleable to the right buyer somewhere down the track.
When I spoke with one of the key staff at Blackmagic Design about how pleased I was with the camera, he was delighted that the image quality from a decade-old URSA Mini 4K could be so well received. That, to me, is precisely the point: many would write off a camera like this as ‘too old by far’. In the spirit of of my father and grandfather, I say, “Leave it with me and I’ll show you how I fixed it up!”
Dr David Smith runs Imaginaction, a film production company based in Victoria. He can be contacted via imaginac@bigpond.net.au
One Comment
[…] Regular readers may remember Dr David Smith’s story a while back about his adventures upgrading a Blackmagic Design URSA Mini 4K Camera. You can read it here. […]