In another article I wrote about the absolute optimism apparently some retailers may have about what they can make out of the resurgence of analogue photography, where if you did not know, instead of shooting to a memory card you use real film.
I started this way like many of my vintage, and really, it is the very best way to learn the skills of photography.
So if you are bored with the good ol’ digital point and shoot model you now use, and have a yearning to learn about analogue photography, here is what you need to know.
THE CAMERA
To actually shoot on film, you need a film camera, right? That goes without saying, however as the starting point for your film journey, it’s not quite as easy is waltzing into your nearest camera shop and plonking down the readies on a new Fujifilm, Canon or Nikon film based SLR say.
Why? Simply because they don’t make ‘em anymore.
What they do make are disposal film cameras that are designed to be taken back to them where they rip them apart, process the negatives and then digitally print off the resultant photographs, charging a price for the privilege. And it’s quite profitable too just quietly.
But. There is an apparent movement to bring back new analogue models, and the first of the serious ones are slated to arrive in July from Japanese manufacturer, Pentax.
(Yes, yes I know you can get top of the line models, but these are aimed at professionals and you’d need to mortgage your dog and the house to afford most of them).
Another way to do it says Lachlan from Leederville Cameras, is to go to a reputable camera dealer, tell them your needs, level of expertise and a price range, and they will be usually be able to suggest a second model they have in stock that has been checked over and / or refurbished.
I would not recommend buying online through eBay or Gumtree in this instance as a film camera is an even more precision piece of equipment than a digital one due to the moving parts necessary for film transport etc.
Reputable brands from my experience include Minolta, Pentax, Olympus and of course the aforementioned Fujifilm, Canon and Nikon.
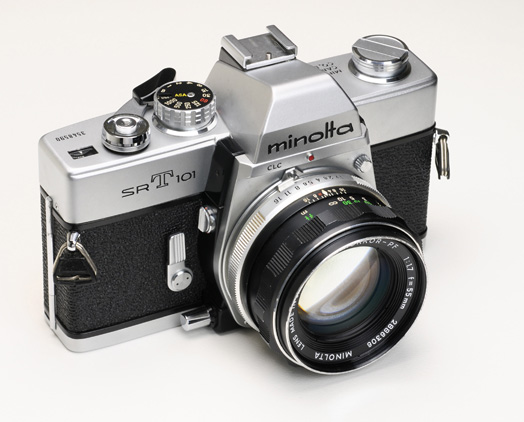
The model I started with was a Minolta SRT101 (pictured). I have seen a few around the traps in great condition for under AUD$250.
The other thing to be aware of is that not all film cameras are equal. As mentioned, unlike a digital camera that stores images on an SD card (usually), film cameras of course use film, and the best to get is a camera that is 35mm compatible. But you see, if you didn’t know this, you have ended up with another film size based camera that would make the processing of the film and the printing much harder. These include 110, 120 and even 2 1/4 square.
The next thing to consider is what lens to use on the camera, and you are best guided here again by the dealer says Lachlan. You don’t want to buy a camera that has a lens totally unsuitable for the type of photography you want to do – and this applies equally to dSLR and mirrorless digital cameras too of course.
FILM (OR FILLUM IF YOU LIKE)

A selection of Ilford monochrome film and printing paper
Now that you have the camera sorted, you next need some film. Unlike a digital camera where you set the ISO in the camera, with film, you buy the film that has the ASA rating you need for the job at hand. In case you are wondering, ISO replaced ASA but they are effectively the same thing, the name was changed to represent an international rating.
For everyday outdoors photography ISO/ASA 100 or 200 film will be fine. For sports photography I’d jump to ASA 400. Again, check with your camera dealer as to the best advice for which film based on your shooting circumstances.
There is also the brand of film to choose to consider. At this time, I am concentrating on monochrome (black and white), and to me, over many, many years of usage, I’d recommend Ilford film.
Ilford has been around forever and so, despite the downturn in film usage over the “digital era” they survived so they must have something right, yes? Unlike say Kodak, who initially went bust. If you are thinking of colour, I like Fujifilm followed by Agfa by the way.
Again, unlike digital, film can also be bought in different emulsion, colour saturation and grain types. For example, Fujifilm has Provia, Velvia, Astia and Classic Chrome.
In the early days of your film experiences, I would basically ignore these side tracks and get used to shooting and processing film before getting into these finer points.
I’ll skip the nuances of shooting film over digital in this article – that’s for maybe another time. Suffice to say best start learning about aperture, shutter speed, using a light meter, depth of field etc. There ain’t no “A” for Automatic here folks. This is REAL photography!
DEVELOPING
The next thing then is to get the film processed; in other words, get the exposed film from the inside of the camera into a negative form you can use to make actual pictures.
This process involves chemicals, developing tanks, trays, water baths and a distinct absence of light! The last thing you want is to expose the raw exposed film to ANY light as this will destroy whatever is on the negative post shooting.
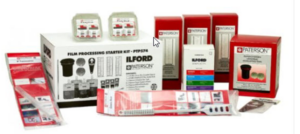
I was lucky when I started as an 11 year old, as my dad owned a photographic studio and therefore had all the gear necessary. I asked Lachlan at Leederville Cameras what the best way was to get all the bits and bobs you need, and it turns out there are starter kits you can buy put out by companies such as Ilford and Paterson containing all the goodies necessary, including comprehensive “How To” instructions, for about $180.
In short, you process the film inside a light proof tank using set of chemicals. Once this is done, the film is washed and allowed to dry before the next process.
These kits contain a special light proof bag with hand holes that allow you to remove the film safely from its cannister and get it into the developing tank on a special spiral mechanism.
PRINTING
 Now this is normally the real fun part; watching an image slowly appear as you hold your breath and see the results of your work for the very first time. Did I get the framing rate? Is it in focus? Is it light enough. Dark enough? Contrasty enough?
In terms of correct exposure, there are some tricks of the trade you can use that, in name anyway, have moved over to the digital Photoshop world such as Dodge and Burn.
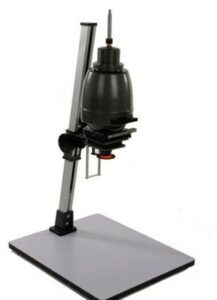
But there is a small catch. In order to do these things in this way, you need to print the photo manually using a piece of equipment called an enlarger. This allows you to expose light through the negative and a lens onto photo sensitive paper. This paper (and it comes in various sizes depending on the size photo you want) is then subjected to a developing fixing and washing and drying process to get the final result.
And the catch? Black and White and Colour enlargers are almost impossible to buy new these days. My research shows they do exist but are usually a special order that can take months to arrive and for an unknown cost at time of purchase, being subject to variances in exchange rates, freight costs and so on.
So, we are back to the second-hand market again, and hopefully, also again, your friendly local dealer will be able to assist and advise accordingly. Brands to look for include Paterson, Durst and Leica units. A quick look at eBay found a few there and they range in price from $150 to just under $1000.
To do darkroom enlarging (yes, we are back to a dark room, but this time you can use a special red light so you can see what you are doing), you’ll also need an area in the dark room for some developing and washing trays and access to running water, plus the ability to string up a line so you can peg your prints to it to dry.
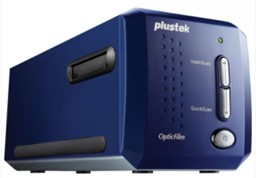 Another easier, but nowhere near as fun, option is to get a negative scanner. This is an electronic device that reads your developed negatives and creates a JPG or TIFF file from each image which can later be printed on a good inkjet printer.
I have little experience of these so asked Lachlan at Leederville Cameras and he suggested either Plustek 8100 ($599) or Plustek 8200i ($899) models are the go here.
At least, they are a good starting point, and if you do get the whole manual film processing bug, you can get into the enlarger / printing thing later.
Of course, if you don’t want to go to the lengths of doing your own processing, D & P (Develop and Processing) labs still exist and your local camera retailer should be able to guide you here.
CONCLUSION
There is a huge satisfaction doing a shoot on film, processing the negatives, and then manually printing the shots. When you get to see that perfect photo gradually at the end of the process, there is no way rummaging a computer folder of hundred of images can compare.
I guarantee it!
Quick and easy just using your smartphone may be, but just as there is no comparison between a microwaved ready meal and a dish you prepared lovingly from scratch, so I don’t think you can beat this basic form of photography to its digital counterpart.
And seriously, it’s not that hard.
Other stories You Might Like...
 Camera Phone Hype – and then there’s the REAL World.
 Tutorial: A Quick Primer on Filters
 Photography and Video Basics (Especially for GoPro Users)
 Which Drone? A Drone Primer and Buying Guide
 Fujifilm Australia launches Photography Masterclasses and Workshops
 Is “Janet” the end of stock photography?
 ZHIYUN Reveals Credit Card-sized 60W Video and Photography Light
 Horror Feature Film Creeping Death Captured with Blackmagic Design
 Microphone pickup types. A quick primer.
 New MOLUS G60 and the MOLUS X100 professional pocket film lights