A question often asked in Facebook forums and other online chat spots for video, GoPros, drones and similar devices is “Why does my footage on YouTube look so crappy? I shot it in 4K and it looks horrible there, but great on my computer”.
There are two basic reasons for this. The first is the easiest to understand and doesn’t require any technical knowledge.
When you initially upload your video, YouTube initially processes it in a low-quality format. This means the upload is done more quickly and therefore your footage is online faster for viewing on computers, smartphones, tablets TVs and so on.
Higher resolutions like 1080p or 4K require more time to process, so while this processing is taking place, it may appear to be of an inferior quality due to only the low res one being available at that time. But after the processing is finished, rest assured, your 1080p HD or 4K video will appear.
The second reason is slightly tied up in the first. This is due to the fact that that processing time I mentioned is dependent on a few factors, notably the format, length, frame rate and quality of the video you uploaded. It can take up to a few hours in some cases.
For example, if you shot your video at 60 frames per second (fps), that will take longer to process than one shot at 25 fps. Similarly, a 1080p video will take less time to process than a 4K one.
As a guide, it is best to shoot and upload in 4K, as even if the playback device doesn’t support 4K, the YouTube down sampling to HiDef (1080p or 720p) will look much better. Another advantage of shooting 4K is that you have greater flexibility when editing as you can crop more without losing resolution.
If you need assistance on how to edit video, I have beginner tutorials here and here (Parts 1 and 2).
But these other factors, if not set so they are “friendly” to YouTube, will also cause a video to play back in less quality than you might have thought would happen.
As you might expect then, YouTube does have some suggested settings to use when creating your video. If you are not sure what this actually means, you’ll probably find references to each of these in your camera’s setup menu.
Firstly, make sure you are shooting in MP4 format. This is the “container” type that will store the frames of the video (you can also call it the file type if you like). Next, if you have the option of setting what is called the video “codec”, the one called H.264 is always a safe option. If you are shooting 4K video, you might also want to try H.265 and see if that works for you and if so, even better.
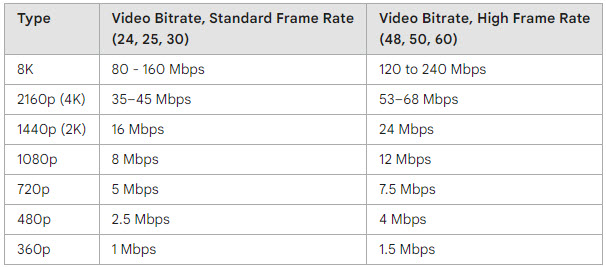
If there is a bitrate option available to you, make it “Variable”. You can also play around with the Bitrate setting to see if this gives any improvement if “variable” isn’t working that well, and YouTube offer the following guidelines, but for most cases, variable will be fine.
Finally, if you have audio, then the audio codec needs to be AAC-LC.
Be aware if you are shooting in a vertical format for TikTok as YouTube prefers an aspect ratio of 16:9 (the same as your TV set), you might get some unpredictable results.
If any of these terms confuse you, or you need some help, send me an email or drop a comment in down below. If there is enough interest, I’ll maybe put together a primer tutorial to assist.


