I have written a lot of material recently around the GoPro / Action Camera universe, covering do’s and don’ts, how to’s and so on.
I’ve had a request if I would do some similar stories for drone users, especially those new to flying.
So here goes as a primer to start with. (If you haven’t bought a drone yet, but are thinking about it, this will be of assistance)
Before You Fly
 While it is expected after shelling out your money for a DJI Mini 3 or Mini 4 you are anxious to get it in the air – or as the longer-term diehards say, “send it” – it is best to consider a few things first to a) get the best from your drone and b) make sure it stays in one piece!
The very first thing to do of course is charge up the battery(s). Usually “out-of-the-box” there will be a residual charge, but it is best to make sure all your batteries are fully charged before flying.
And remember, the batteries in a drone are lithium based so they need to be treated with a bit more care and respect than your best Eveready Red! If you are in any doubt as to what these considerations are, there is a good primer here.
Next, you need to prepare your SD card(s). If your particular drone allows you to format the card inside the drone, then do so. If not, then check what sort of formatting it expects (usually exFAT) and format the card in your computer accordingly.
By the way, personally I recommend having a number of smaller capacity cards as against a single large capacity one. This came about through experience; my first real drone was a GoPro Karma, and one day after filming a portion of a fishing TV show on Hervey Bay in QLD, we brought the drone in to change the card as it was full. We replaced the card and sent the drone off again to capture footage of a pod of whales that had surfaced around us.
Sadly, the GoPro Karma – no longer available – had a bad, bad fault in that the battery warning system was faulty and out by around 3 minutes. Consequently, my Karma ended up on the bottom of Hervey Bay …
Thankfully though, as we had changed the SD card, we managed to keep all the important footage!
Oh, and don’t scrimp on SD cards, thinking cheap no-names will suffice. They are a false economy. I have a whole piece on choosing SD cards and other issues here and here. I use and highly recommend Verbatim SD cards.
Play Safe and Use Common Sense
Now that your batteries are charged and SD cards formatted, the next step is to make sure where you are going to fly is actually in a legal area. This is a whole minefield in itself.
There is a certain cohort who feel they can just “send it” from wherever and whenever they like and to hell with the rules in general, and CASA, the governing body, in particular.
If you are not familiar with the rules, they are really quite straightforward, rely mostly on common sense, and I have written them up here as a 2 page PDF to download.
If you have a specific question, you can ask CASA directly via its website and its Chat system. Having used it a number of times, I can promise they don’t bite!
Many of the DJI drones have a built-in geofencing system; this means that if you attempt to fly inside a no-go area, the drone simply will not take off as the controller software is tied to the no-fly zone database. In an emergency, this CAN be overridden, but you need to contact DJI directly to get them to unlock the software at that time.
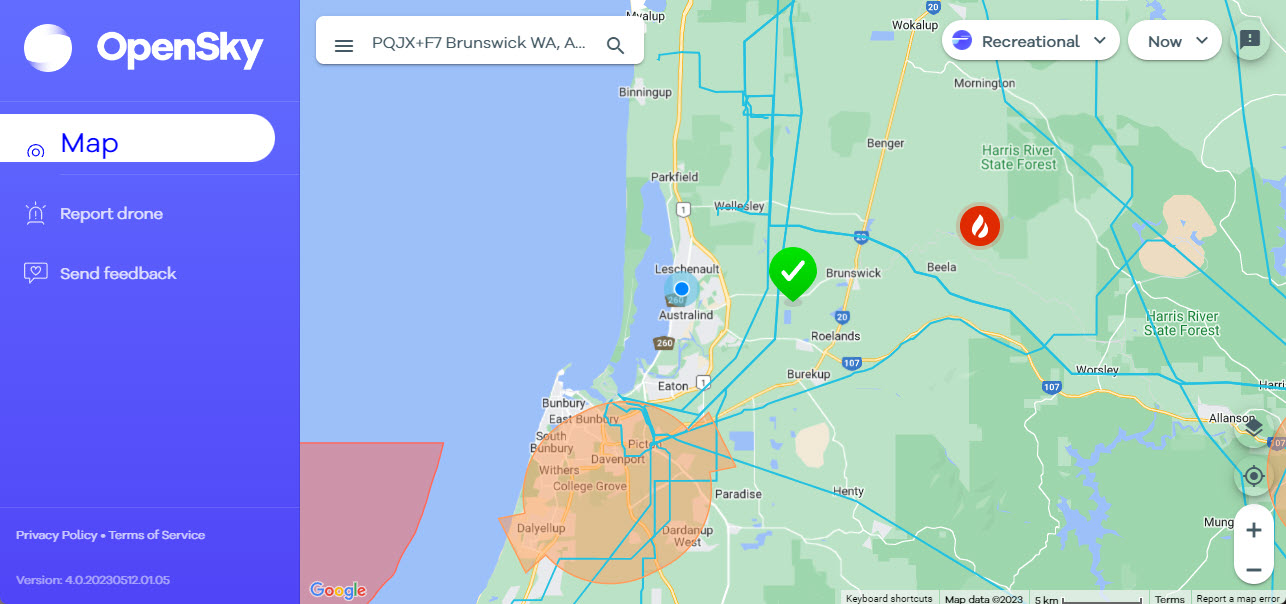
If you don’t have geofencing, or simply want to double check, a piece of software called OpenSky is available showing you the areas you can and cannot go. For example, in my immediate vicinity (where the green tick is on the map) I am OK to fly, but further south as there is an uncontrolled airport, I am not. In my case, all my drones have geofencing, so inside that orange area, none of them will take off at all.
The red symbol shows a bushfire burn off or actual bushfire so as there may be helitankers or helicopters in the area, it acts as a warning to not fly there at present.
And be aware the fines are extensive and painful if you do break the rules and get caught.
Once In The Air
Once you have successfully taken off, it is a requirement that the drone is kept within line of visual sight at all times. If you do lose sight, it is important not to panic (people do!) Use the controller (or your smartphone if your drone is controlled by an app), to stop the drone and hover, and then slowly rotate the drone and try and get an indication of where it might be from what the camera is showing.
If you still cannot see the physical drone, if your drone has a return to home option, then invoke that to bring it automatically back to the place it was launched from. Once it has received the command, the drone should rise to a height that is safe, and then use minimal power to prolong battery life to get back to you.
Check your drone manual for what return to home settings there may be.
IMPORTANT: Make sure before you fly that the drone’s system has reset the point of take off to the current one. DJI drones will give you an audible voice message that this has been carried out. Anecdotally there is a story of a VERY expensive rescue drone that was commanded to return home after a mishap. So, it did, or at least tried to. From a Sydney beach to Scotland, as someone had forgotten to reset ‘home’ from the factory setting of where it was built.
The return to home option is one of the very best reasons to get a done from a reputable manufacturer such as DJI by the way, as against no name brands.
The other thing to be cautious of is battery life and drain. Be aware if there is any wind, this will lower your battery life, especially if you are flying into a breeze. You might get to a destination very easily, but if once there, you are flying back into a stiff breeze, it is possible to run out of electricities!
The average maximum time for flying in my drones is about 25 minutes. I ALWAYS allow myself a 5 minute safety margin at least, just in case.
Getting Imagery
Whilst the flying part is fun, you’ll no doubt want to use the drone’s camera to get some still shots or video footage. A decent drone will have a camera system that allows you to change settings in much the way you can on your smartphone. More expensive models give you even more control, and some even have twin lenses, but no matter which you have, take the time to learn how to use the camera and understand what the settings are and do.
All the normal rules of photography / videography apply here by the way, with the added one that when shooting video, you want to fly as smooth as possible. And definitely avoid the temptation to do too much drone rotation!
You also want to remember where the sun is in order not to get solar flare or over exposure in your shots.
If you are flying over any sort of water, also avoid the temptation to fly too low. If your drone has obstacle avoidance systems, these can get confused by water reflection and cause your drone to go for an instant swim.
TIP: Once you have landed, get the footage off the SD card and onto your computer as soon as possible then re-format your card.
For video editing, on either the Mac or Windows I recommend DaVinci Resolve (its free as well as being one hell of an editing package) or alternatively, I have used Vegas Pro and fxHome Hitfilm very successfully. For image editing, its hard to go past Adobe Photoshop or Lightroom of course, but GIMP is a freebie for the Mac or Windows too.
Conclusion
Once you have landed, check the drone over for any damage such as props that are cracked, gimbals for the camera not operating as they should and so on. It is also recommended to remove the battery and store it safely. Everything should then be packed in its case for safe keeping, after wiping it over to remove any dirt, squashed bugs and so on.
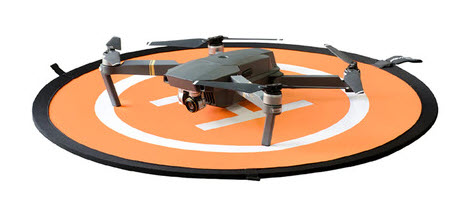 Another thing I recommend is the use of a landing pad. This means you won’t have to land on sand or grass and risk getting any particles into the innards of the drone that could cause a malfunction when in flight. I use one made by PGYTECH that costs around $25 from places such as Camzilla or the D1 Store.
Finally, you’ll want to edit your footage or capture your stills. I use a simple folder system to keep track of my flights and videos. In a folder called “Drone Flights”, I have separate folders for each drone (Air2S, Mini 3, AVATA etc) and then once I have imagery from a flight, I file this under the specific drone’s folder with the name of the location and the date.
For example, a flight over the Leschenault Inlet here could be filed under Drone Flights/Air2S/Leschenault Nov 13th 2023.
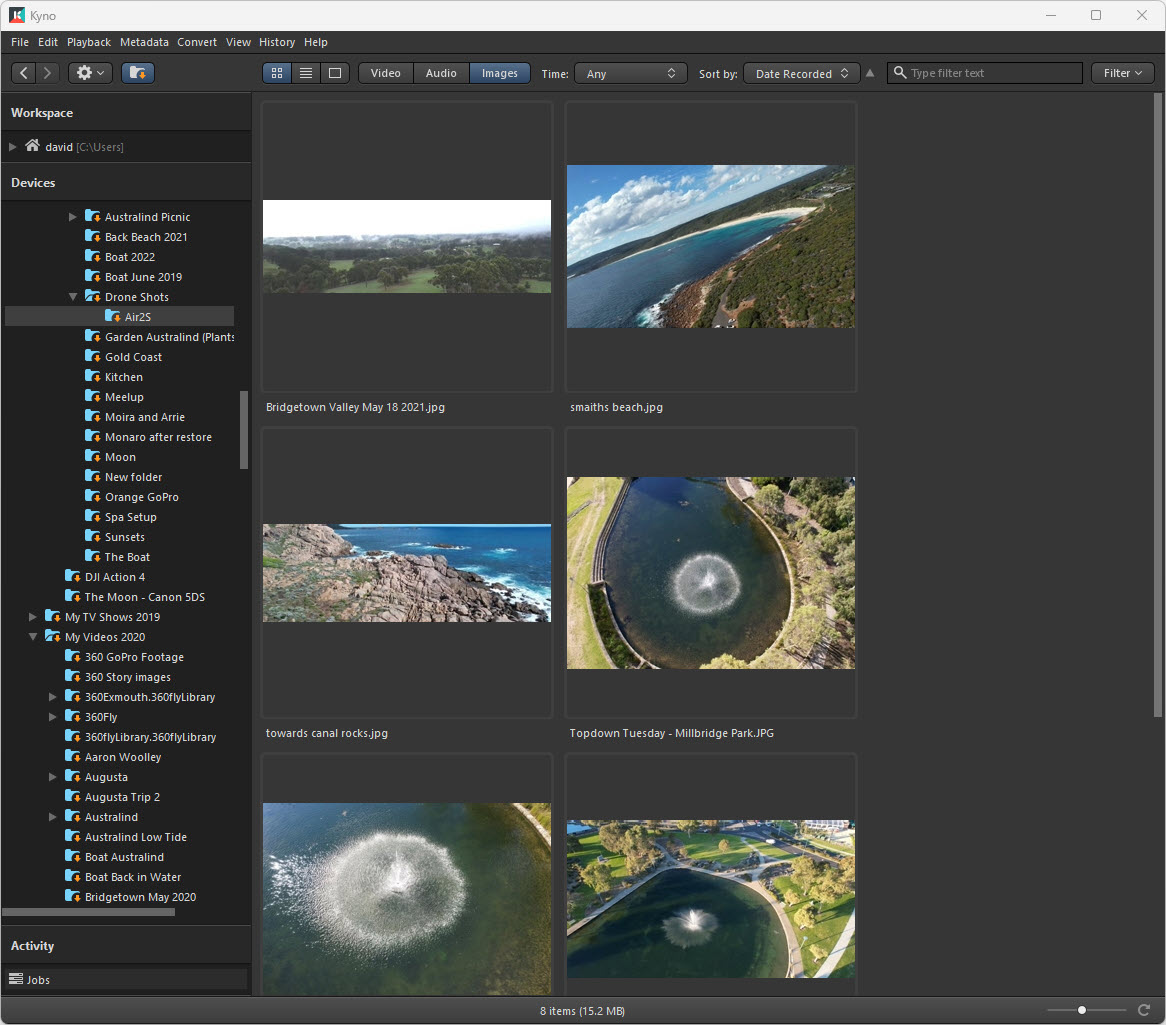
I also use a specific piece of software called Kyno that specialises in cataloguing video, images and even audio allowing me to search by date, subject, location and even the drone (or camera) it was shot on.
ONE LAST TIP: This is unsolicited as they don’t pay me to suggest this I promise, but if you do decide to buy a DJI drone – and I recommend them – I strongly suggest you also get the DJI Care Package the company offers. Once you have this, and you do have a mishap, for a minimal fee DJI will usually replace your drone. It is a very cheap form of insurance.
Be assured of one thing; at some point, whether it be a major stack or a small, bump, you WILL have a crash! Best to be prepared just in case!
If you have any questions, please feel free to contact me, and remember I have a dedicated drone section on the Creative Content website. And I cannot stress enough that you thoroughly read and become familiar with your drone’s manual and all the drone controls so they become an automatic process.
And practice makes perfect!