We spend hours learning all about our cameras, study up on such technicalities as ISO, depth of field and focus, make sure we have all the good gear in terms of tripods, the right SD cards and know our photo or video editing software inside out.
Sound familiar?
But there are of course two pieces of the final puzzle not included in that list – audio and lighting.
For the beginner and even not so beginner, these areas can seem like some mystic science best left to boffins. I have dealt with audio many times over the years and a search of terms such as “audio” or “microphone” in the search bar at the top of any Creative Content web page will give you a whole bunch of material to get your teeth into in that area.
But I have not covered a lot about lighting over the years I admit. So that is about to be rectified.
Now I do not pretend to be any sort of expert in this area, so I called upon someone who is to assist, and that’s Sydney based company Kayell which distributes lighting gear from Aputure as well as other companies.
I’ll be doing this over a using 3 different articles, with this being the first which covers the very basics of lighting.
The second part will cover specific lighting types – how to get a particular look in different circumstances such as those used in different TV shows and films etc.
The third will be even more specific and cover situations such as lighting when snorkelling, suppressing lighting for astrophotography, using lightboxes, shooting food and so on.
So without further ado, let’s dive right in.
Basics of Lighting
Planning
It may seem obvious, but many do not think about this aspect of lighting, simply turning up on the day of the shoot and then working out what is the best approach. It is far better to scout out the location beforehand and plan accordingly.
If the shoot is inside, can you get natural light from a window, has the location got room to place lighting that won’t get in the shot or where do the lights need to go to get the right ‘mood’?
If it is an outdoors shoot, can you compensate if the weather changes? Even if there is sunlight available, will you need to augment it? Where will the shadows fall?
You get the idea.
Three Point Lighting
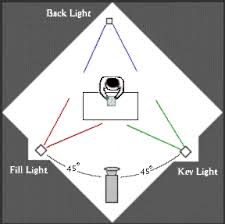
The very basic lighting setup is called three-point lighting and is commonly used for such things as interviews, corporate video and so on. As the name suggests, there are three lights used, placed at strategic points. These are called the key, fill and back light.
(Some people suggest that in these types of shoots, at a pinch you can get away without a back light, but I’d recommend that should be an exception and only done if you simply can’t get or use a back light).
The key light is the brightest, providing most of the light in the shot. It is usually placed in front of your subject at around 45 degrees above and 45 degrees to the right or left.
The back light’s job is to separate the main subject from its background. The idea is to create depth and detail, so the shot doesn’t look “flat” without contrast. To achieve this place the light above and behind your subject. As the back light will create no visible shadows on the subject’s face, a hard light without any diffusion can be used as a back light.
The fill light is a softer light than the other two and used to fill in or eliminate shadows on the subject’s face. The fill light should be positioned to the opposite side of the key light and its intensity is usually around half of the intensity of the key light.
Natural Light
If you are using natural lighting it requires some special considerations. The lighting will change as the time-of-day changes and of course weather is a factor. You may find the sun is too intense and therefore you get harsh shadows, and you’ll need to avoid lens flares caused by the sun hitting the lens directly.
As a general rule of thumb when shooting in natural light, make the sun your key light and use reflectors to simulate fill and back lights.
A useful thing to understand is what photographers and film makers call “the golden hour” which is that time in the early morning and late afternoon. A brilliant tool here is an app called PhotoPills which has a heap of inbuilt functionality to work out shooting times based on sun (and moon times) and lots of other things too such as depth of field, planning shoots and much more besides. And if you are interested in astrophotography, I’d say it is indispensable and well worth the AUD$17
Have a look at their website as there is also a large number of tutorials available there.
In the next article I’ll give some examples of basic kits to start with as well as what other gear you might need for different lighting situations and the costs associated with that. I’ll also cover techniques used in this area.
If you have any questions, please feel free to email me or leave a comment. I am happy to pass any specific requests for exactly what type of light you might need to Kayell for their expertise as well and they will contact you directly.