I wrote this piece nearly 6 years ago now, but as the subjected has popped up a few times in various forums, I thought it worth revisiting and updating as it is a necessary part of video and photography to understand.
Ands that is the terminology of Depth of Field (often interchanged with the word ‘bokeh’). In short, Depth of Field will go a long way to dictating what will be in focus and what will not.
Note, as the GoPro has a fixed lens and aperture, the following is not possible can’t be done, but this is still good information to understand even if your only camera is a GoPro due to it being a big part of basic photography / videography 101.
In order to explain it, you need to understand some basic terms:
Aperture: How wide the lens (or as someone called it, they “eye”) is open. The wider it is, the more light gets in. Oddly, the lower the number eg 5.6 or 2.8 say, the wider it is.
Shutter Speed: The amount of time the shutter is open letting light in. Think of an eye blinking if you like. Of course, then, the lower the shutter speed (in seconds and down to fractions) the more light is getting in.
It stands to reason then, there is a balance between aperture settings and shutter speed, right? On most cameras today, you can cheat and just set the camera to automatic, and the brain of the camera will sort all that nonsense out for you. But why did you spend good dollars then on a flash new camera when you could spend a fraction of the money and get the current version of the old “Instamatic”?
A lesser cheat is to choose an aperture setting (the big ‘A’ on the rotary dial on the top of the camera usually) and let the camera work out the shutter speed. Alternatively, select ‘S’ (yep, for Shutter Speed), and after setting one, the camera will work out the correct aperture. These are called ‘Priority” settings by the way.
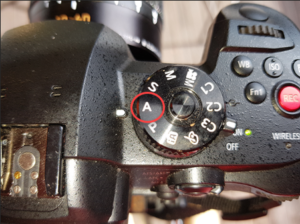
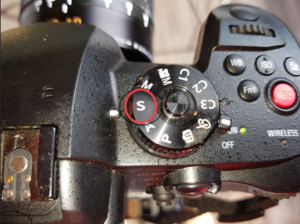
But here is the kicker. The camera can only work on the info it has and is certainly not infallible, so these are guides only. Many times, they will work, but not in all circumstances, so be aware of that.
In simple terms, the wider (lower number) the aperture, the lower the depth of field gets. This means that objects close to the lens are in focus and those further away are out of focus. Close down the aperture (make the aperture smaller, with a higher number) and the “in sharp” distance is larger. And this is another case of the balance needed between shutter speed and aperture.
Is there a way to learn this? Why, yes, yes there is! I give you the unpatented David Hague Emu Bitter beer can method.
- Setup an Emu Bitter beer stubbie / can on a table in the open in daylight. Option: Open and drink first. Highly recommended.

- Place your camera, ideally on a tripod (when should you use a tripod? Whenever you have one) about 2 metres away. Set the ISO for 400 (more on this a little later, for now, just do it OK).
- Open the aperture to its widest – probably f8 – and set the shutter speed to 1/60th(or 125th in very bright sunlight) and focus on the can. Why the f? Each setting is called an f-stop. Yes, but WHY? Since you asked:
3. The f-number of an optical system (such as a camera lens) is the ratio of the system’s focal length to the diameter of the entrance pupil. It is also known as the focal ratio,f-ratio, or f–stop.
- Get a notepad and pencil.
- Take a shot, note down the settings of aperture and shutter speed. Review the shot in your camera’s pop out LCD (there is usually a ‘Play’ button marked as a right facing arrowhead somewhere on the camera top or back. To exit playback, usually a half press of the shutter release will take you back to “take photo” mode.

- Now, keeping the shutter speed where it is, change the aperture to the next highest, refocus and repeat Step 5.

- Repeat Step 6 followed by Step 5, until you have reached minimum aperture (usually f22)

You will no doubt see that as the aperture decreases in size (a higher number remember), the image gets darker and darker to the point that eventually, you probably won’t see anything but darkness. You’ll also note that as you refocus, more and more of the background, not just the Emu Bitter beer can, comes into focus.
- Now repeat steps 1-7 but start the shutter speed at 1/1000thand set the aperture to f16 and keep THAT constant. With each step, DECREASE the shutter speed to the next lowest through 1/500th, 1/250th, 1/125th, 1/60th and so on down to about ½ second. Don’t forget to take notes for each shot describing the settings used and what you saw in the camera’s LCD when put in playback mode for each shot.
This is the best way I have found to come to grips with the twins of aperture and shutter speed and become used to them. Eventually, as you experiment in real life taking photos (or video as the same principles apply except you may find aperture called “iris”) and take multiple shots with different settings of the same subject, rather than a one-off shot on automatic, it will become second nature to pick an average setting for say a sunrise or sunset and deviate from that average a little with a shutter speed or aperture change due to distance, bright light or some other factor. The same applies for shots over snow, in dull, overcast conditions, or with a waterproof camera.
In other words, there is nothing in photography that is “average” and why there are no ‘standard’ settings on cameras like GoPros.
It is the use of these combinations that causes creativity in photography – along with camera angle, light placement, framing etc of course.
ISO
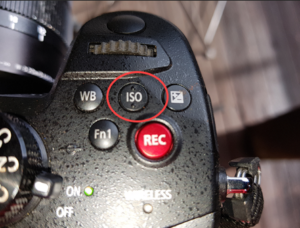
Now before you are overwhelmed, let’s just touch lightly on a term I mentioned earlier, ISO. In the “old days” of film cameras, this was also known more commonly as “ASA” and is a measure of the film’s “speed”. The higher the number of the ISO, the more sensitive it is to light.
In Step 2 above, I suggested ISO 400, and this is a good setting to use for every day type stuff. If the sunlight is especially bright, you might want to knock it down to 200.
But why not increase the shutter speed you ask? Simple, because then you might alter it too much for the f setting, or going the other way, and SLOWING the shutter speed, may cause a fast moving object – a flying bird, jumping, breaching whale – to be blurred.
The drawback of ISO is that with the higher film speed, while being able to work in lower and lower light, a factor called ‘grain’ is brought into the equation. And ‘grain’ is exactly what is sounds like; the image looks grainy.
If you are mainly shooting everyday stuff, I’d stick to ISO 400 and playing with aperture and shutter speeds along with focus to start with. You may want to up the ISO if say shooting at an outdoor night time BBQ, but as always, take a few test shots first with different settings to see what the results will be.

If you are after the ubiquitous nighttime star shot while parked in the middle of the Simpson desert, by all means have a play – after all that is what it is all about. A high ISO and L-O-N-G shutter speed with an appropriate aperture can get some amazing photos (and video) any pro would be proud of.
If you need more dedicated GoPro information, have a look at my special 60+ page e-Magazine specifically dedicated to GoPros, accessories, how-tos, tutorials, hints, tips, reviews and more. You can see the details here.


