I thought I’d stay on the photography theme a little while longer and touch on a subject I have been playing with off and on for a while now, and that is astrophotography.
I first approached this at the beginning of the millennium when I still lived on the Northern Beaches of Sydney. I had interviewed someone who as it turned out lived close by and was somewhat famous in this area of photography and videography, Steve Massey.
It Started With a Telescope
This got me all fired up and so I went out and spent serious money on a telescope and a film based Minolta SLR camera, and spent many happy hours shooting images and video of the Moon primarily.
When I moved back to Western Australia and down to the deep forests of the south-west of Western Australia, I upgraded the telescope and also abandoned the Minolta in favour of a Canon 5DS dSLR.
The absolute lack of ambient (and therefore interfering) light was offset by the amount of cloud we used to get, so the actual telescope time was minimal. And then a particularly ridiculous accident I want go into knocked the telescope and its tripod over rendering the focussing mechanism impossible to use.
Shortly after I moved back to civilisation 200Km south of Perth, and with COVID hitting decided to try and revive my damaged telescope.
The spare parts were available, but all things being what they were it took nearly 9 months to actually get them here!
In the interim, I discovered a little gizmo called the MSM, or “Move-Shoot-Move”.
And its brilliant.
Science
A little bit of science is needed here to fully explain what the MSM does and why.
When you first get a telescope, you suddenly became Aacutely aware that the Earth moves through space, and pretty damn quickly at that. It first struck home when I finally managed to get an image of the Moon in the ‘scope that was nice and sharp. I had to go inside for something another – only gone a minute or two – and when I came back out, my image had gone!
Of course, the Earth is ripping through space at something like 500 metres per second or around 1600Km / hour at the equator. Hence the image of the Moon is moving across the field of view of the telescope at the same rate, so you get about a minute depending on the magnification of the telescope.
If you are lucky enough to be able to get, say Jupiter or Saturn in sight AND focus, then you have mere seconds.
But to get decent still shots, which require lots of light, you need more than this, so there is the dilemma.
You can buy mechanisms for telescopes to follow the earth’s rotation and also lock in on celestial objects, but this tends to get very expensive for the hobbyist
So, enter the Move-Shoot-Move (MSM).
MSM
 The MSM is a small black box that mounts onto a tripod. There, that was easy.
But there is a lot more to it than that of course. You see, once it is charged up, and via various mounts, a camera attached – either DSLR or Mirrorless – the inbuilt motor rotates so that when you have locked onto a subject in the night sky, it will always stay in place as the camera rotates with the Earth.
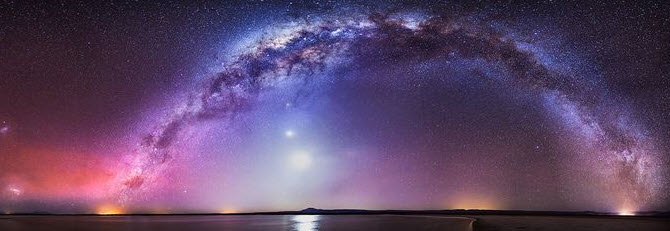
You set the camera using either its inbuilt intervalometer or an add on one and set the aperture and ISO accordingly. If all goes well, you get shots like these.
Inter-what?
An intervalometer is either an inbuilt function of the camera – and many have it – to tell the shutter to stay open for a specific period of time, beyond the normal 1/500th or 1/20th sec for example. To get shots like shown here, shutter times of up to 10 minutes or more are used.
The smart ones can also be set for multiple shots that are timed and other functions.
 If your camera does not possess an internal intervalometer, go to your favourite camera store and ask for an external one that suits your make / model. An example of one I can recommend is the Hahnel Captur Timer Kit from Leederville Cameras.
And while you can fluke it and get a great shot with a single image, those that are REALLY good at this stuff take many, many images of the subject in order to get as much data as possible, and then using specialist software, much of it free, “stack” these together to create a single composite image.
Polar South
Of course, there is a catch, sort of. You’ll recall when I stated the Earth’s movement rate, I was careful to clarify that this speed is “at the equator”. The Earth rotates at different rates depending on where you are, and so the MSM needs to be calibrated in order to get the exact setting.
In the Northern hemisphere this is relatively easy as they have a celestial body in the sky (where else I suppose?) called the Pole Star which to all intents and purposes is based exactly at True North. By calibrating the MSM, using a laser scope that comes with the system, to the Pole Star, you are good to go.
In the Southern Hemisphere we don’t have that luxury, and while there are ways to do this with methods using other stars, these are relatively complicated. So, there is a far better way, and it has added bonuses too.
PhotoPills
 I have mentioned the PhotoPills app before in stories, in order to calculate sun and moon rise times and locations in order to get the right positioning and timing to get specific shots.
But another piece of magic PhotoPills does is let you align the MSM quickly and easily to correctly set it for shooting deep space shots and stars. A combination of the inbuilt compass and a virtual reality overlay, with your smartphone attached via a mount to your MSM, lets you align perfectly to Polar South by simply lining up cross hairs to a central target.
With that done, you can then mount your camera, adjust the appropriate settings for aperture, ISO and the intervalometer and you are good to go.
In theory.
Final Tips
 Of course, to get the perfect shot takes lots of practice and patience. I’d recommend a few things to make life easier.
- Initially don’t be too ambitious. Just get some shots to get a feel for what you are doing and learn what settings may be best. And make notes, or better, shoot RAW so the camera settings are embedded into the meta of each image
- To learn where planets, stars, constellations, asteroids, meteor showers and other stuff up there are, download a copy of the free program Stellarium for your PC, Mac, tablet whatever. It is absolutely bulging with information and can also create virtual skies based on locations and times.
- Get yourself a headband light that has the red-light option. This way, you’ll be able to see what you are doing but not stuff up your night sight.
- Use a decent tripod. The one thing you do not want to happen is for your camera to move in any way at all. I use a Miller Solo75 and can highly recommend it.
- The MSM is rated to a specific weight so this limits the lens you can use. Even my Canon 5DS with an 80-200mm is too heavy, so these days I use a Fujifilm X-T20 with a 16mm f/2.8 which is pretty close to what it appears the experts in the field use. But even if you have a base camera with a 28mm or something similar, you can still get some breathtaking shots.
- Apart from no camera movement (apart from that given by the MSM of course) the other thing that is imperative is focus. You must have your subject in absolutely pinpoint focus. Some cameras allow you to zoom into the image on the LCD for focussing, so if you have this use it. Otherwise focus to infinity but pull it back just a fraction. Some people place a piece of tape to lock the lens in place once they have that sweet spot worked out.
- Learn your camera. Shooting stars and planets etc is NOT the place for “A” for “Automatic!”
- Keep away from as much external light splatter as you can. The darker you can get it the better. Avoid streetlights, light from windows, car headlights and even the light of the Moon as much as possible.
- Look at as many YouTube tutorials, read as many online articles and so on as you can. There is always something to learn. There are some great tutorials on the MSM web site as a starting point, and you’ll also find some really good YouTube channels you’ll like. I started with this one.
- Above all be patient. Hopefully you’ll jag a great shot within your second or third attempts, but if you haven’t, just keep trying as when you do, it’s worth the wait and effort trust me!