What the hell is a review of a 3D printer doing in a magazine / website about video and filmmaking?
Well Dear Readers, I beg of you to persist and read on as I do think you will find this interesting…
And useful.
At the beginning of the year, I decided to indulge in a lifelong passion, model railways. Well re-indulge really as back in the UK in the 60s we had a monster set in the attic.
What triggered this was a story I did back in October last year on a chap in the UK who had a fantastic model railway set and had pioneered a way of shooting video from it via a GoPro and then using Vegas Pro 17 and very clever motion Bezier masks, added “real” backgrounds to the video, thus mimicking exactly the location he had built in miniature.
Now for anyone involved – past or present – in model railway making, particularly Hornby HO gauge, they will know purchasing the genuine article buildings and accessories from Hornby such as railway crossing, light poles, platforms etc, is bloody expensive (a price tag of £40 is not unknown per unit), so I toyed with looking at 3D printers, as online there is a plethora of models you can download, print, assemble and then paint for next to nothing.
BeerVirus™ put a kibosh on the idea temporarily, but the offer for me to work casually at the local JayCar store (as reported previously) re-introduced me to the technology as the company sells three different models.
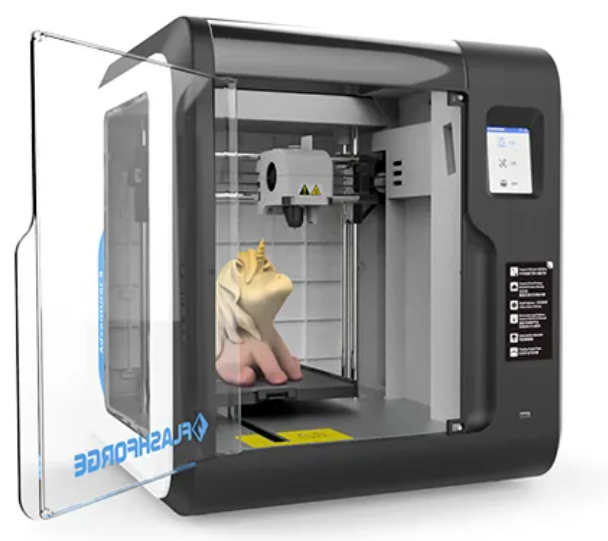
In-store I played around with the demo unit and convinced myself to buy one after a few weeks, the Flashforge Adventurer Adventurer 3.
This unit prints using PLA or ABS filament (I am using PLA) models up to 150mm x 150mm and you can either print directly from your PC or Mac (using *.g or *.gx files) via Wifi or through a network, or via their CloudForge system using the – well Cloud (internet) where you can send any number of formats, and the website will convert them to the *g* format for you and “slice” the images / models, and then send back to the printer for local printing (you register your printer with the cloud to identify it). You have the option before printing of sizing, scaling and placing the model.

You can even do this remotely and then watch the print, also remotely, as it occurs using an inbuilt web camera in the Adventurer 3.
The time of print depends on the complexity of the model of course. The longest I have had was my first print, a very detailed Dalek from Dr Who that stands 150mm tall, and this took approximately 12 hours. My average print for model railway components so far is just on an hour by comparison.
If you want the full technical specs of the Adventurer 3D, then click here.
So where does video fit in?
The limit of just what you can print is only limited by a) your imagination b) time, c) the availability of a model and d) if no model is available, how keen you are to get your hands dirty in 3D modelling software to make your own.
To cover a) is straightforward, b) is not an issue as you can print overnight if you wish (the Adventurer draws 150W but we are on solar so no biggie there. C0 depends on what you want and any number of websites contain the *stil files of thousands of free and paid models for just about anything you can imagine (I use Thingiverse and yet to be beaten on searching for a model).
When it comes to d), for many years I have been using Cinema 4D from Maxon to create 3D models and whilst nowhere near an expert, do possess sufficient efficiency to make basic stuff for my needs and am currently undergoing a further training course online to hone my skills.

And this is where video comes in and I need to digress for a moment.
As many know, one of my pet hates when reviewing cameras and camcorders is there non-ability to view the LCD screens in sunlight. If there is an EVF, this is not so much an issue of course.
When it does become an issue though, is when flying drones to get footage – I use a Mavic Mini – and you need to hijack your smartphone to act as monitor. For many smartphones, particularly those without an AMOLED screen, in sunlight they are unreadable thus rendered useless.
So, guess what? Using the Adventurer 3 I am currently designing and modelling a sunshade system to eliminate this problem once and for all.
When finished it will house the controller of the Mavic Mini and the smartphone in a single unit.
Cost of the build? In materials, estimated at around $2! Satisfaction rating? Priceless!
I am already thinking of building custom dollies, GoPro mounts and similar using the Flashforge Adventurer 3 and IO am sure many other ideas will pop into my head.
Using it is dead easy once you discover a couple of quirks (which are not deal breakers by any stretch). The documentation leaves a bit to be desired, but that seems to be normal these days and there is a heap of tutorials and so on on the ‘net of course.
Cinema 4D might be a tad expensive for some, but in comparison to many packages of this ilk, it is much easier to pick up and https://www.blender.org/there is a fantastic intro tutorial system at Greyscale Gorilla. Failing that, Blender is Open Source and free and will accomplish most tasks I believe.
Conclusion
‘Having now had the Adventurer 3 for a few weeks, I am of the firm belief that a 3D printer will become another tool in the filmmakers’ toolbox alongside other things we might not have thought of only a few short years ago.
Could we have imagined drones, 360° degree cameras, affordable underwater shooting, attaching cameras to race cars or yachts or aircraft that only cost a few hundred dollars in say, 1980?
Or could the Star Wars model makers have envisaged being to print a model overnight and shooting it the next day on a green screen or compositing on a computer costing a $1000?
Next time you are in or near a JayCar store, pop in and have a look (there is a bigger model available too) and ask for a demo.
If you have any questions regarding the Flashforge Adventurer 3, please feel fre to email me!


