To anyone who has ever harboured the idea of writing an episode of Dr Who, the sequel to The Shawshank Redemption, a new sitcom or even a musical, the most daunting thing is that blank piece of metaphorical paper on the computer screen.
The second is knowing exactly what format to use? Each of these types of scripts, and more, require industry standard layouts to make them acceptable to not just the potential actors, but of course networks, producers and directors. And each is different.
Further muddying the waters, what the BBC requires as a script layout, is not necessarily what the US NBC network might require for example.
Sure, if you are an absolute whizz at Microsoft Word Style Sheets, paragraph formatting and macros you could rustle something up, but why go to all this bother when it already exists? Or to put it another way, why reinvent the wheel?
And this particular wheel is a piece of software widely regarded as the pinnacle of scriptwriting software, and has been for at least a decade I know of, called Final Draft.
Version 13 was recently released, and whilst I thought they would be hard pressed to improve on version 12, I have been proven very wrong.
Overview
But first, for those who may not be aware of what Final Draft is / does, a quick overview is in order. And I’ll use a fictious script by way of an example using a standard screenplay template that is just one of the many supplied with the application.
Once you have chosen your script, a blank document opens; on the Final Draft screen there are four main areas you need to be familiar with to get the most from the program and these are the Menu Bar, Tool Bar, the Page and the Status Bar.
In most screenplays, the very first thing you’ll enter is the Scene Heading, a description of the location and the time of day. Instead of having to enter the whole description manually, Final Draft has a set of shortcuts already built in, rapidly speeding up the process.
For example, if your screenplay starts inside a restaurant, just press the letter “I” (for Interior) and what Final Draft calls its “SmartType” system will open a drop-down box with all the possible locations starting with an “I” – in this case “INT” for Interior and “I/E” for Interior / Exterior with the “I” option highlighted. You simply need to press the TAB key to select it and then enter the name of the location such as Restaurant. Final Draft will automatically correctly format this in capitals.
Once you have done this, a further press of the TAB key pops up a similar drop-down men u, but this time with a selection of times of day, and again, pressing TAB after choosing one via its first letter, the arrow keys or the mouse, will enter it correctly formatted into the script.
The next line of a script is traditionally an Action Line, and this describes the action or some visual information that takes place in the scene. By the way, to see what element is currently in place (Scene heading, action line etc), the toolbar displays this at top centre.
A typical action line for our fictitious script could be “The first guests of the evening walk through the front door to be greeted by the maître d’”.
After pressing ENTER, the cursor will go to a new line and the cursor will be blinking. This means you can now change to a new script element by simply pressing ENTER again to open another drop-down menu with all possible element types and shortcut keys, for example “Character”.
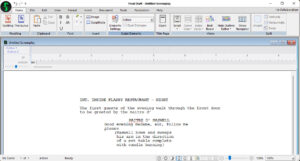 Selecting this allows you to enter a character’s name, and then pressing enter means you can type dialogue for that character. If you then wanted to add something further to this, pressing TAB and then typing a left parentheses means you can add what is called parenthetical paragraph which adds something to the dialogue.
An example of this might be:
MAITRE D’ MAXWELL
Good evening madame, sir, follow me please”
(Maxwell bows and sweeps his arm in the direction of a set table complete with candle burning)
Pressing ENTER lets you continue any further dialogue.
All the necessary correct formatting is taken care of by Final Draft letting you concentrate on the content rather than the look of the script. It rapidly becomes second nature to either press TAB or ENTER at the end of a line in order to correctly add the next element you want in the script. If you do inadvertently enter the wrong element type, simply right clicking brings up a menu letting you switch from one type to another along with the correct formatting for that element.
Other Tools
That small sample should give you an indication of how Final Draft lets you concentrate on the content as against the layout of your script. And if that was all it did, I still reckon it is streets ahead of any word processor. But Final Draft does so much more.
These include Outlining, the ability to insert images, and even emojis into a Beat Board system, collaboration tools, a revision system, the option to visually track script elements, outlines, acts, sequences or scenes by colour coding, statistics and much more.
For me, the two most important parts of Final Draft outside of the actual SmartType formatting system are the BeatBoard and the Outline Editor.
Beat Board
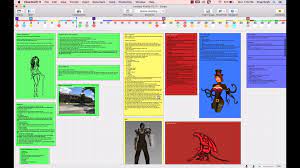 Think of the BeatBoard as like a giant corkboard where you can pin thoughts, notes, images, plan sequences and scenes, design characters and even fully formatted elements from your script. “Beats” can be placed anywhere on the board and moved around at will to any order you like, and you can zoom in and out on the BeatBoard to view portions or the whole.
Beats can then be used in the outline editor and even be referenced during the actual writing process if required. On the BeatBoard, beats can be sized, and colour coded at will, aligned vertically or horizontally and even cascaded if you want. Plus, you have the option to display the entire contents of a Beat or just the heading and to show any relationships, Beats can be connected by flow lines further adding to their usefulness.
For collaboration, BeatBoards can be exported as a PDF and emailed or otherwise shared.
Outline Editor
I first came across outlining with Microsoft Word some 30+ years ago. It was originally an add-on app called “Thinktank”, and later MS bought that company and integrated the add-on into the full version.
In simple terms, outlining lets you visual a story, script or whatever as a series of levels allowing you to get your thoughts and the story flow together in a logical sequence. Move one level to another location and all the sub-levels – children of the one being move – will follow automatically.
It is still mostly the way I write just about everything, and a function anyone who writes and / or uses Word I think should know and utilise.
In Final Draft, the outline editor gives you a linear representation of the structure of a document, and lets you visually plan structure and story points.

The “timeline” of the outline is actually page numbers, and by default, there are two other areas, called lanes, you can use, called Outline 1 and Outline 2. An example of using a combination of beats and outlines is to use Outline 1 as the sequence of acts, and Outline 2 as scenes within each act. You can add more lanes as you want for whatever purpose, for example, keeping track of where a character appears. Lanes can be renamed and formatted if you wish by right clicking.
Beats can be dragged directly onto the outline lanes, and you zoom in or out to get as much – or little – detail you need. Once in place, the length of a beat – how many pages in the document it will cover, – can be dragged as required.
Any acts that are moved to Outlines are considered as children of the Beat above it, and if that is moved elsewehere, the children will automatically follow.
I think the Outline Editor in conjunction with the BeatBoard create an almost perfect and unbeatable combination for the purpose of creating stories, scripts, documents or whatever. If you do any of these, get a trial copy of Final Draft for Mac or PC from www.finaldraft.com.
I promise you will not be disappointed.
