To the majority of people, the term “colour grading” invokes images of a sort of “black art” performed by weird video magicians in some deep, creepy dungeon somewhere, huddled over a complex control panel of knobs and wheels and trackballs, while on softly glowing screens, strange patterns appear alongside coloured arcs and curtains of red, green and blue like some sort of Aurora Borealis.
In other words, it’s all too hard and if you close your eyes for a second, or (or at least change the mode your video editing package has somehow got into), it will all go away.
And I admit, I was one of those people. Oh, I knew OF colour grading, and sort of what it did and why, but certainly not the mechanics of how it was done.
But then Blackmagic Design sent me their new Micro Colour Panel to review, and after reading a few websites, watching a couple of tutorials and reading the information that came with the panel, I have a fair idea.
Further, after playing with it for a while, I am also hooked!
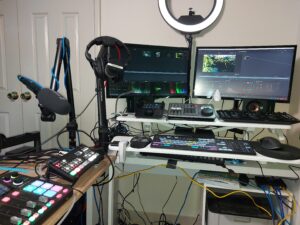
Now, I admit I like panels. I like the tactile feel of the things, which I guess is a throwback to my days mixing live bands in the 70s and 80s. Consequently, in my video recording / editing setup I have a RØDECaster Duo, Loupedeck CT, my much-loved Blackmagic Speed Editor and of course the Blackmagic Design ATEM Mini Pro.
Matched together with a logickeyboard DaVinci Resolve keyboard, and a working knowledge of hot keys means I can quickly get down to the business when editing. ESPECIALLY with the Speed Editor.
After my brief (so far) play, throwing the Micro Colour Panel into the mix then makes perfect sense.
So, what is it exactly, and how does it work.
I won’t be going into any great detail on actual colour grading; I recommend the video on YouTube called “80% of Colour Grading Basics in Only 20 Minutes” for that (https://www.youtube.com/watch?v=sunTYl71hZs). The best description I found is a quote I found on the Mango Street Labs website during my research;
Colour Grading involves adjusting and enhancing the colours and tones of a film to create a specific mood or atmosphere. Through colour grading, filmmakers can evoke emotions, set the tone for a scene, and enhance the overall aesthetic of the film. It also helps in maintaining consistency in the visual presentation throughout the movie. Some benefits of colour grading include creating a cohesive look, fixing colour inconsistencies, and enhancing the storytelling aspect of the film”.
While you can perform colour grading without a panel such as the Micro Colour Panel, and just about every major video editing package such as Vegas, Adobe Premiere Pro, Final Cut and of course, DaVinci Resolve has colour grading functionality built in, using the Micro Colour Panel makes it so much easier, and I’d venture to suggest, offers far more control and flexibility.
The main controls are the three large trackballs with associated rings in the centre of the panel. Depending on the mode you are in, these are used to manipulate and fine tune aspects of the colour of the clip or still image. In Primary mode, these control Lift, Gamma and Gain and in LOG mode, Shadow, Midtone and Highlight.
Across the top of the panel are more control knobs that are used for controlling such aspects as colour boost, contrast, saturation and hue.
Down the left and right sides of the panel are banks of yet more controls that both contain standard function keys for Copy, Paste, Undo, Redo etc and navigation controls like Next Frame, Prev Clip, Next Keyframe and also Toggles for putting the trackballs into an offset mode, auto colour function, and bypassing grades.
The quick start documentation that comes with the Micro Colour Panel does a great job explaining each of the trackballs, wheels, knobs and buttons, and if you need more, you can download a full product manual from the Blackmagic website.
Okay, this all sounds you beaut, but maybe it’s also a bit, “well that all sounds interesting, but really, I can’t be bothered”, and that was sort of my first reaction too.
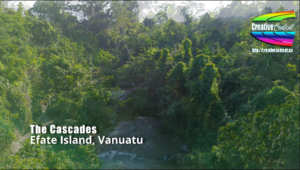
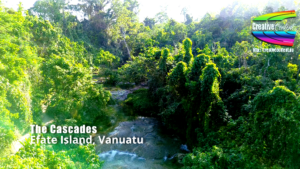
However, I decided to search for a clip that I could perhaps play around with and see what this was really all about in a real-world scenario. The clip I decided on was one I shot last year in Vanuatu. It is drone footage from my DJI Mini 3 of the Cascades on Efate Island.
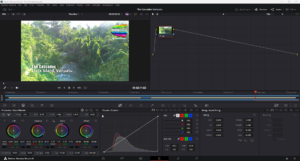
And after another quick tutorial, and twiddling a few knobs and dials, I was utterly blown away with what a difference using the Micro Control Panel can make. The fine tuning possible to get the image just as you want it – and the ability to immediately undo / reset if you go too far – is amazing, and even quite good fun!

It really allows the creative juices to flow, and yes, even though I thought the original footage was pretty damn good, the difference I could make using the Micro Colour Panel was quite astounding and convinced me I need one.
I’d suggest you have a read of some blogs, tutorials etc on colour grading, watch some YouTube videos to get the idea of what its all about, and even catch some YouTube videos on the Micro Colour Panel itself (there are not that many yet unfortunately).
Better, if you can find a store like VideoPro, Videoguys or similar that might have a working setup, go and have a play with some of your own clips and see for yourself.
I reckon you might come to the same conclusion I have. Oh by the way it costs AUD$700 or thereabouts.
For more info, see https://www.blackmagicdesign.com/products/davinciresolve/panels